
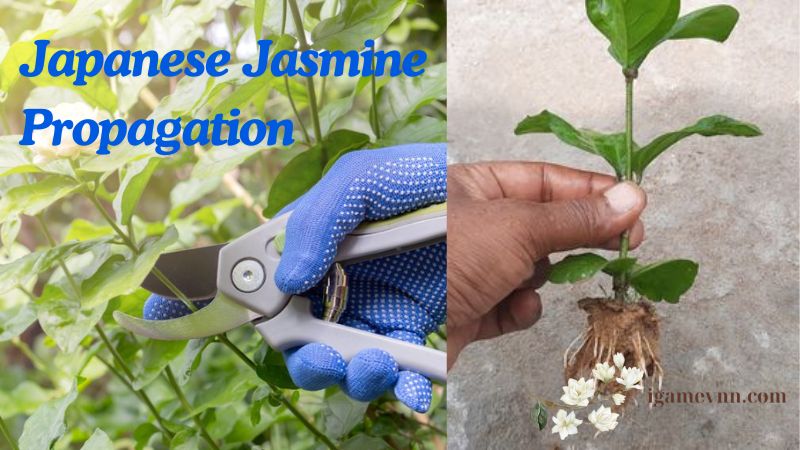
Japanese jasmine (Jasminum mesnyi), also known as Primrose jasmine, is a popular ornamental plant known for its bright yellow flowers and vigorous growth. It can be propagated through various methods, including stem cuttings, layering, and division. Each method has its own advantages and can be chosen based on convenience and resources available. This detailed guide from Igamevnn will walk you through each method step-by-step to help you successfully propagate Japanese jasmine.
Table of Contents
ToggleJapanese Jasmine Propagation Methods
Method 1: Stem Cuttings
Stem cuttings are a common and effective method for Japanese jasmine propagation. This technique involves taking a section of the stem from the parent plant and encouraging it to root in a new medium.
Materials Needed:
- Sharp, sterilized pruning shears
- Rooting hormone (optional)
- Potting mix
- Pots or containers
- Plastic bags or a propagation dome
Steps:
- Select a Healthy Stem:
- Choose a healthy stem from the parent plant. The best time for Japanese jasmine propagation through stem cuttings is in late spring or early summer when the plant is actively growing.
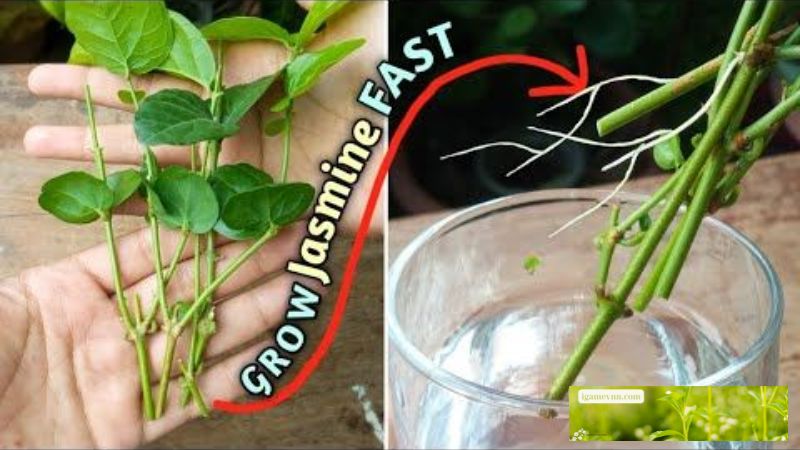
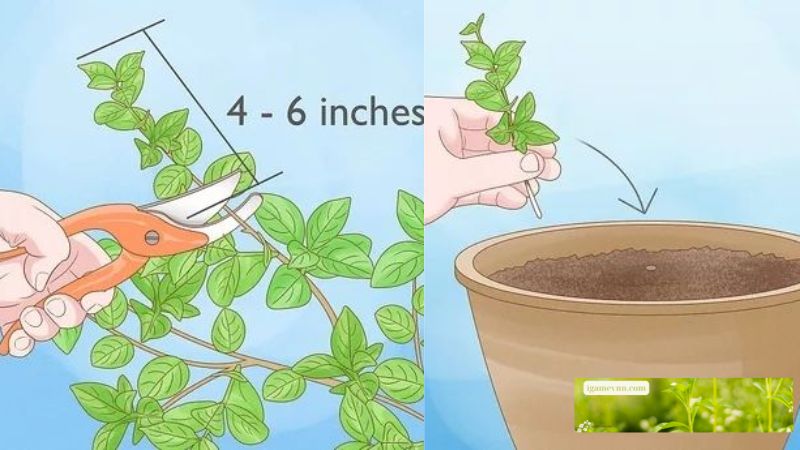
- Take the Cutting:
- Using sterilized pruning shears, cut a 4-6 inch section of the stem just below a node (the point where leaves attach to the stem). This node is crucial as it contains the cells necessary for root development.
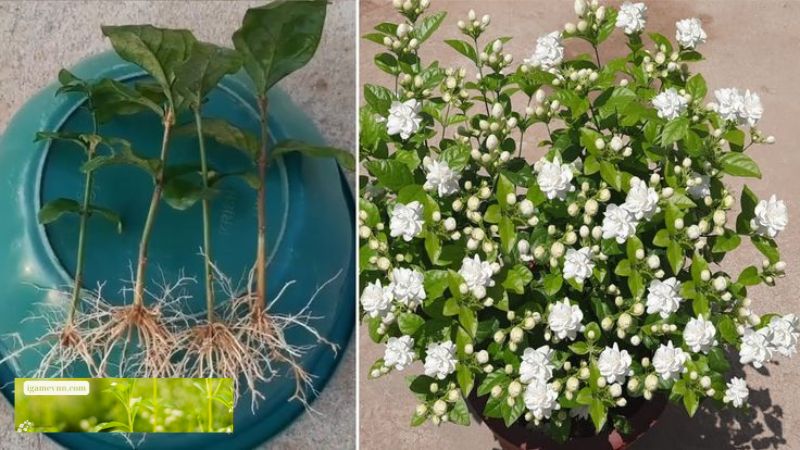
- Prepare the Cutting:
- Remove the lower leaves from the cutting, leaving a few at the top. This reduces water loss through transpiration.
- Dip the cut end in rooting hormone (optional) to enhance root development. Rooting hormone can improve the success rate of Japanese jasmine propagation by promoting faster root growth.
- Plant the Cutting:
- Fill a pot with a well-draining potting mix. A mix designed for seed starting or cuttings is ideal.
- Insert the cutting into the soil, ensuring that the node is buried. Firm the soil around the cutting to provide support.
- Water the cutting thoroughly to settle the soil around the roots.
- Create a Humid Environment:
- Cover the pot with a plastic bag or place it under a propagation dome to maintain humidity. This creates a mini-greenhouse effect, reducing water loss and promoting root development.
- Place the pot in a warm, bright location but out of direct sunlight. Indirect light is ideal for Japanese jasmine propagation as it prevents the cutting from drying out.
- Care for the Cutting:
- Keep the soil moist but not waterlogged. Overwatering can lead to rot, while underwatering can prevent root formation.
- Check for root development after a few weeks by gently tugging on the cutting. If you feel resistance, roots have formed. Once well-rooted, the cutting can be transplanted to a larger pot or directly into the garden.
Method 2: Layering
Layering is another effective method for Japanese jasmine propagation. This technique involves rooting a stem while it is still attached to the parent plant, ensuring a higher success rate due to the continuous supply of nutrients.
Steps:
- Select a Low-Growing Stem:
- Choose a healthy, flexible stem that can be bent to the ground. This stem should be long enough to bury a portion while leaving the tip exposed.
- Prepare the Stem:
- Make a small wound on the underside of the stem where it will touch the soil. This wound should be a shallow cut to encourage rooting without damaging the stem too much.
- Bury the Stem:
- Bury the wounded section of the stem 2-3 inches deep in the soil, securing it with a U-shaped pin or a stone. Ensure the tip of the stem is left exposed above the soil.
- Water the buried section regularly to keep it moist. Consistent moisture is crucial for root formation during Japanese jasmine propagation.
- Care for the Layered Stem:
- Continue to water the area regularly, keeping the soil consistently moist but not waterlogged.
- After a few months, roots should develop at the buried section. You can check for root development by gently uncovering the soil around the buried stem.
- Sever and Transplant:
- Once roots have developed, sever the new plant from the parent stem using sterilized pruning shears.
- Transplant the new plant to a prepared location with well-draining soil. Water the new plant thoroughly and continue to care for it as it establishes itself.
Method 3: Division
Division is suitable for well-established Japanese jasmine plants with multiple stems. This method is often used when the plant becomes too large and needs to be divided to encourage better growth and propagation.
Steps:
- Dig Up the Plant:
- Carefully dig up the parent plant without damaging the roots. This is best done in early spring or late fall when the plant is not in active growth.
- Separate the Clumps:
- Divide the plant into smaller sections, ensuring each section has roots and stems. Use a sharp, sterilized knife or spade to make clean cuts between the sections.
- Replant the Divisions:
- Plant each division in a new location or pot with well-draining soil. Ensure the planting hole is deep enough to accommodate the roots without crowding.
- Water the new plants thoroughly to help them settle in their new locations.
- Care for the Divisions:
- Keep the soil moist until the new plants are established. Mulching around the base of the plants can help retain moisture and reduce weed competition.
- Regularly monitor the new plants for signs of stress or disease, and provide additional care as needed.
General Tips for Japanese Jasmine Propagation
- Timing: Propagate in the growing season (spring or early summer) for the best results. This is when the plant is actively growing and can recover quickly from the propagation process.
- Location: Ensure the propagation area has good air circulation to prevent mold and mildew. Adequate ventilation is crucial for the health of young plants.
- Patience: Be patient, as root development can take several weeks to months depending on the method used. Consistent care and monitoring will ensure the success of your Japanese jasmine propagation efforts.
Conclusion
Japanese jasmine propagation can be a rewarding experience, allowing you to expand your garden or share this beautiful plant with others. Whether you choose stem cuttings, layering, or division, each method has its own benefits and can be adapted to suit your needs. By following the detailed steps outlined in this guide about Japanese jasmine propagation throughout the process, you can ensure a successful and thriving garden of Japanese jasmine plants.